
Once the component is installed click the top menu and choose Components > JoomCourses.

Configuration
There are several tabs in the configuration. One is for the general settings, one is for the general layout settings, last one is for the permissions and all the others are usually settings for a specific view.
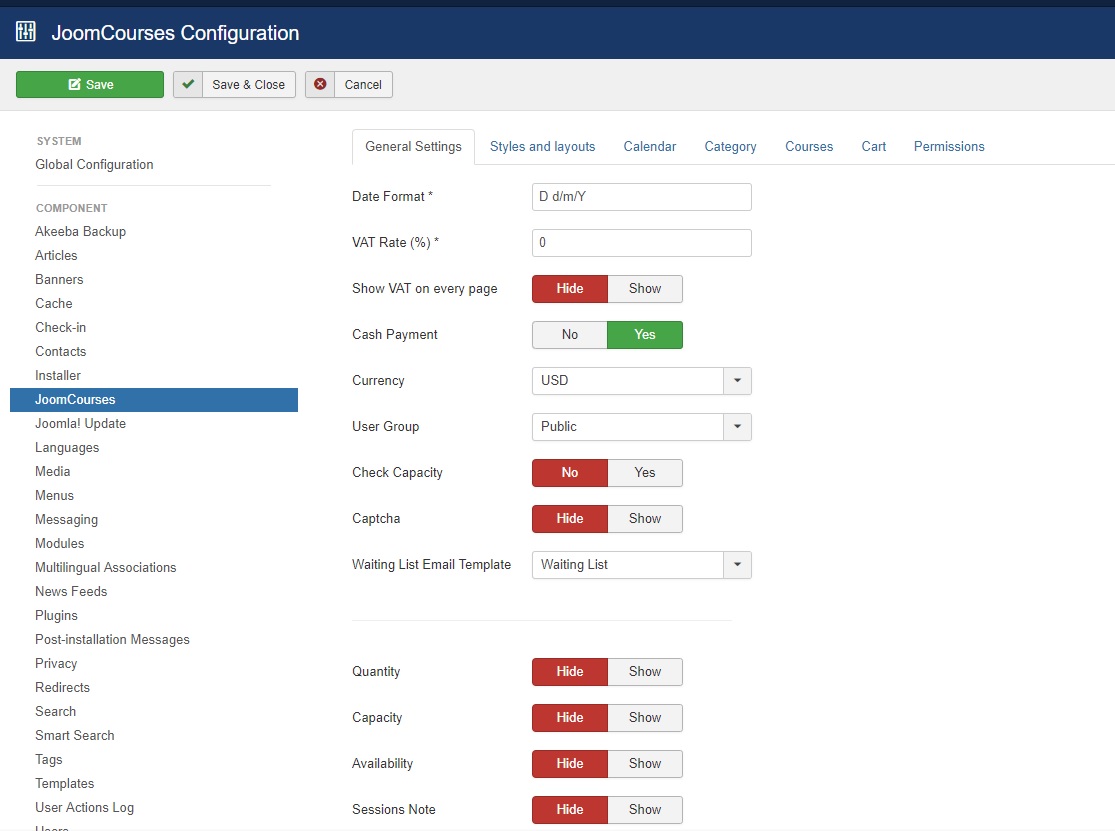
General Settings
- Date Format – default display format for the course dates
- VAT Rate – if you need to show prices with VAT, please fill in your VAT rate
- Show VAT – set to show if you want to display the prices also with the Vat rate set above
- Currency – default currency
- Check Capacity – set yes, if you do not want to allow bookings if there is no free seat left
- Captcha – captcha is a dynamically created image that prevents robots to submit the application forms. Users need to re-type the number from the picture to proceed with their bookings. The captcha uses standard php GD library for image processing. If you have issue with displaying captcha on your server, you can turn it off.
- Waiting List Email Template – here you can select an email template that will be sent to users on the waiting lists if some seat becomes available. You need to create an email template first before you can choose it in the configuration.
- The remaining fields are course details parameters. You can choose which ones you want to show to the visitors and which ones will be hidden in the front-end.
Styles and Layouts
- Use Component’s CSS – set no, if you want to replace the default css styling and use your own css styles for the component pages
- Load component’s Bootstrap – you can force Joomla to always load the Bootstrap html library into the html documents by setting this option to yes. Bootstrap is a core Joomla library used by the default Joomla administration and front-end templates
- Show heading – if set to yes, then all the views that contain a table of rows will display headings
- Pagination Limit – if set to yes, then all the views that contain a paginated table of rows will display a dropdown to select how many records should be displayed per page
Calendar View
- Event Color – set the default color for the events in the calendar. You can also specify unique colors for each course while editing course details
- Description Length – components displays a description when you click the event in the calendar view. Here you can specify how long the displayed description can be.
Setting up Referential Data
Before you can create your first course and its dates you have to create some referential data such as email templates, course locations, experience levels and course groups.
Email Templates
- Go to Components >JoomCourses and click Email Templates
- Click New to edit new record
- Type in the email title
- Select the email type. You can choose from:
- a. Booking Confirmation – this email is sent to the customer after the booking form is submitted
- b. Waiting List – this email is sent to the users that are assigned to the waiting lists if some seat in the course they like becomes available
- c. Booking State Changed – please ignore this option, as it is not used anywhere. We are considering dropping this option.
- Booking Confirmation – this email is sent to the customer after the booking form is submitted
- Waiting List – this email is sent to the users that are assigned to the waiting lists if some seat in the course they like becomes available
- Booking State Changed – please ignore this option, as it is not used anywhere. We are considering dropping this option.
- BCC – if you want to receive a copy of the emails sent, you can leave your address in BCC field
- Subject – email subject
- Body – the main text
- Save changes
There are several variables you can use in the email templates. Those variables are dynamically replaced with the values from the database during the sending procedure. Click the variable you want to use to move them across to the email body section.
Experience Level, Group, Location
Before you can create the course itself, you have to set up experience levels, class groups and locations.
- Choose Options from the left menu
- Click New button
- Type in Title that will appear to your visitors
- Type in Alias that will be used in the url. You can leave it blank, as system will create it automatically.
- Choose one of the Data Types – this is the step where you choose whether you are creating an experience level, group or a location
- Type in a unique code for the record. Even though the Code field is a mandatory field it is not used anywhere and so can be used just in your data exports for additional tracking.
- Description field can contain any text describing the record you are just creating. This field is not used at this moment, but it can be useful for some views in the future.
- Save changes to save your new record
Create a tutor
Before you create a course, please make sure you have at least one contact created in the Contacts section in JoomCourses component. If not, then create it, as this contact can be assigned as a tutor to a course later on.
Note: each booking will create new contact as well. So there will be your customers as well as tutors mixed all together in Contacts section in the administration.
Categories, Tags
Create at least one category before you caret your course. Category is a mandatory field in the course details, so you cannot save your course if you haven’t created a category item.
Tags are optional details for the courses. That means you don’t have to use them at all. Tags can be useful to promote your courses. You can create a tag e.g. New or Hot to show that there is a new course in the list in the front-end.