
Using JoomSMS you will be able to give your users the possibility to import/export their own receivers, manage their credits, send their own messages etc.
In this documentation we will take a look at :
- How to enable the customer management
- How to manage the users credits
- How to buy credits
- Create menu items for the front-end management
- Assign a group to a user
How to enable the customer management
The activation of the customer management is pretty simple. You only have to go to the JoomSMS configuration page, click on the "interface" tab and then set "Yes" to the "Allow customer management" option.
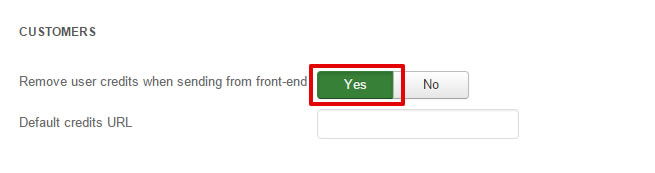
Once this option set to "Yes" all the front-end features will change. Nobody will be able to send SMS from the front-end without credits anymore. Even the administrators will have to own credits to send SMS from front-end. Furthermore the front-end users will only have the possibility send SMS to the lists they manage.
How to manage the user credits
Once the front-end management enabled, you will have to give your users the possibility to send SMS.
In order to enable this feature you should follow these steps
- Click on the customers item in the menu
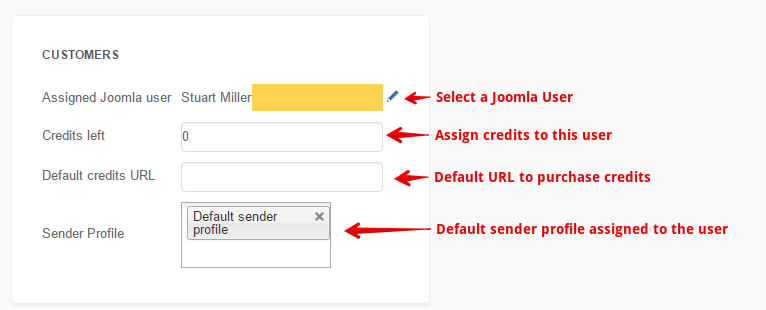
- Click on the button "New"
- Assign a Joomla user to this customer (Allow this Joomla user to send SMS)
- Assign some credits to this user
- Save
Once done the customer will be able to log into the front-end using his Joomla access. Then he will be able to send SMS while his credits are positive.
How to buy credits
he user is out of credits, he will be able to buy some again through an integration with your e-commerce extension.
In order to give your client the possibility to buy credits you will need an e-commerce component on your website.
- At the moment the e-commerce components supported by JoomSMS for this feature are :
- HikaShop
- VirtueMart
- MijoShop
- Using this component you will have to create a new product which will represent your credits. Once the product well configured with the tax and the price you want, you will have to access the JoomSMS configuration.
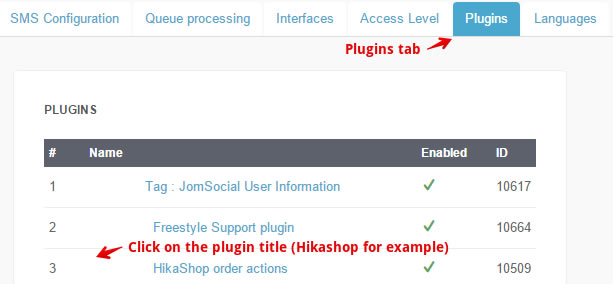
- Click on the plugin tab and search for the JoomSMS plugin related to the installed component.
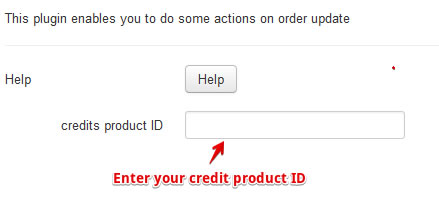
- If you edit the plugin (Just click on its name) you will have to define the ID of the product corresponding to the credits.
- Enter the product ID and then save the plugin
- Go to the JoomSMS configuration page tab "Interface" and edit the credits default URL (URL to your product page)
- Save the configuration
The easiest way to give your users the link to your product is to display a new menu item which will redirect them to your product. However each time a user will try to send SMS without having enough credits JoomSMS will display a message with a link to the credit URL you defined (Your product).
The other solution to give your user the possibility to purchase credits is to follow these simple steps :
- Create a product which will represent your credits
- Set the product code (HikaShop) or the product SKU (VirtueMart and MijoShop) value to "SMSCREDITS_X" => the character X should be replaced by the number of credits you want to add to the user account
- Add the other informations (Price, Product Name etc)
- Save the product
- Then once the user will purchase the product, the number of credits you set (Example : SMSCREDITS_10 for 10 credits) will be multiplied by the product quantity the user purchased.
So, if the user purchased 5 times the product with the product code/sku value set to SMSCREDITS_10 the user will get 50 credits.
Create menu items for the front-end management
Your website is now well configured and you can give your customers the possibility to manage their own users. The first step is to give them an easy access to the JoomSMS front-end page.
You should create a new menu item for the front-end receivers management. Then in the item configuration you should select "Front-end receivers management"
You should also create another menu item for the front-end message management. The only difference is to select "Front-end message management" instead of "Front-end receivers management" in the pop-up.
Then save your items and you're done. The next step is to assign a group to your customers so that they will be able to manage their groups and their users.
Assign a group to your user
In order to let your user manage his own users you need to assign him a group. Here are the steps to follow :
- Click on the menu button "Group"
- Create a new group
- Enter the name of the group
- Select the user you want to assign the group to
- Save the group
Now your user is able to access the front-end page and is now able to manage his own users.