
Joomla! user registration Plugin for JoomForms allows you to create a customizable user registration form. With this plugin you will be able to create your own custom registration forms and collect extra informations.
Enable integration
- To be able to use this plugin make sure to enable it first, go to Backend -> Click on Extensions in top menu then Plugins manager -> search for this plugin "System - JoomForms Registration Form" and enable it
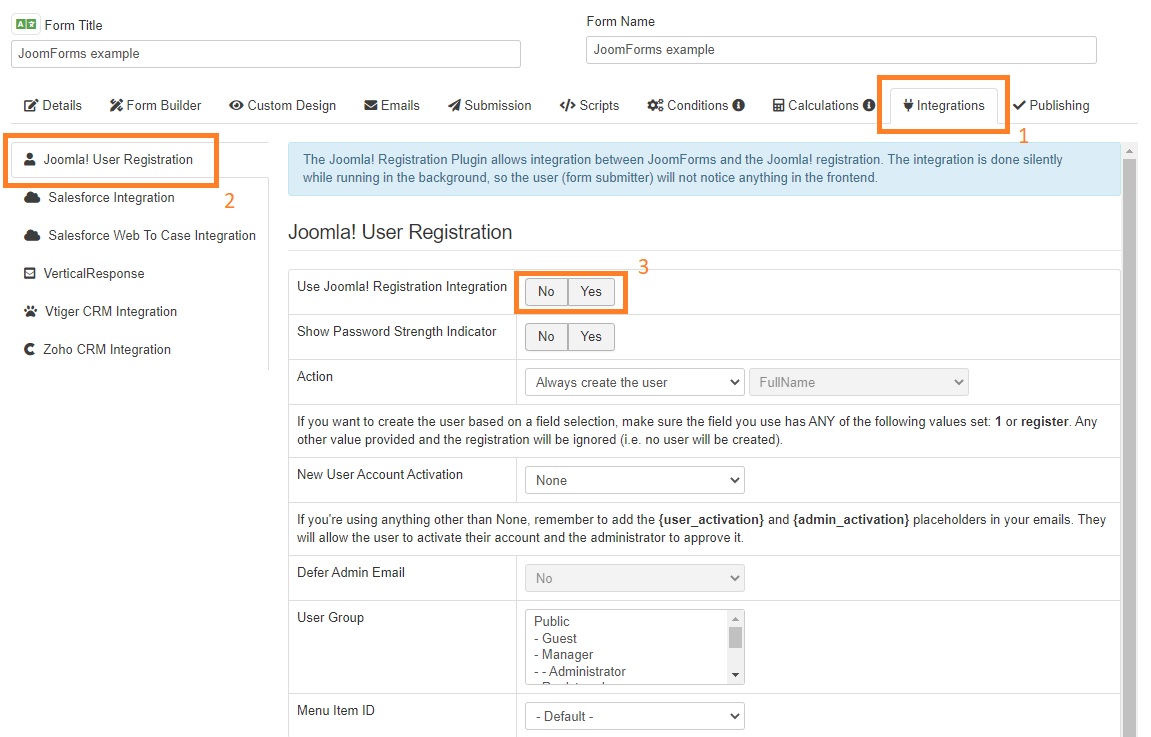
- Once plugin is enabled go to Forms manager view in JoomForms component , then edit the form where you want to use the Joomla! registration integration, after that go to tab "Integrations"
General Configuration
- Use Joomla! Registration integration: Yes / No - you can enable / disable the Joomla! registration functionality by setting this option to Yes or No.
- Show Password Strength Indicator: Yes / No - enable this option if you want to display an indicator bar below the password field.
- Action: Always create the user / Based on another field - you can either offer the form's submitter the choice of having a new user account created on your website after the form's submission (by using the Based on another field option) or to force the creation of a new account (by setting this option to Always create the user). If you want to create the user based on a field selection, make sure the field you use has ANY of the following values set: 1 or register. Any other value provided and the registration will be ignored (i.e. no user will be created).
- New User Account Activation: None / Self / Admin. If you're using anything other than None, remember to add the {user_activation} and {admin_activation} placeholders in your emails. They will allow the user to activate their account and the administrator to approve it.
- Defer Admin Email: No / Yes - set to Yes in order to delay the sending of the Admin Email until after the user clicks on the activation link.
- User Group: choose the Joomla! user group in which you wish to add the newly created account.
- Menu Item ID: the item ID that will be appended to the links received in the email. Use this to create a SEF link pointing to a menu item other than the default one that the user is on.
User Activation Configuration
This area gets displayed when New User Account Activation is set to either Self or Admin. A single parameter is configurable:
- User Activation Action: None (Joomla! default) / Redirect to the URL specified below / Show message specified below - Set the action to be taken after the user clicks the Activation Link. When selecting Redirect to the URL specified below a new field will be displayed, URL, in which you must specify the URL of the page where the user will be redirected. If Show message specified below is selected, you will need to specify, in the newly added Message field, the message that will get displayed.
Admin Activation Configuration
This area gets displayed when New User Account Activation is set to Admin. A single parameter is configurable:
- Admin Activation Action: Set the action to be taken after the admin clicks the Activation Link. When selecting Redirect to the URL specified below a new field will be displayed, URL, in which you must specify the URL of the page where the admin will be redirected. If Show message specified below is selected, you will need to specify, in the newly added Message field, the message that will get displayed.
Registration Fields Configuration
On the left side you will find the fields from Joomla! registration. You can map them to JoomForms fields, so that they will automatically be populated with user-supplied data.
- Name: Map the Joomla! registration Name field with one of your form's fields.
- Username: Map the Joomla! registration Username field with one of your form's fields.
- Email: Map the Joomla! registration Email field with one of your form's fields.
- Verify Email: Map the Joomla! registration Verify Email field with one of your form's fields.
- Password: Map the Joomla! registration Password field with one of your form's fields.
- Verify Password: Map the Joomla! registration Verify Password field with one of your form's fields.
- Consent: this is only available when the Joomla! "System - Privacy Consent" plugin is enabled (useful so the consent is given directly from your custom form, instead of having the user give an extra consent, imposed by System - Privacy Consent plugin). You can map this to one of your form fields (usually the one you're using for users to give their consent; for example a checkbox). Note that the field you're choosing to be mapped, has to return a value (it can be anything, though blank/empty values won't work).
Custom Fields Configuration
This section handles the Joomla! User Custom Fields that you have set under Users > Fields area.
The custom field needs to have the following permission Allowed: 'Edit Custom Field Value' for the User Group to which the submitter is part of (edit your User Custom Field > Permissions).
If you have custom fields added for your users, these will show here for you to map. Of course if you map fields like checkboxes, the JoomForms field mapped here will need to have the exact values matching your custom user checkbox items (same for any other field that provides choices against already pre-defined values).
User Profile Fields Configuration
If the User - Profile plugin is enabled, you'll be able to map the user Profile fields data as well.
Activation Emails
This Plugin overrides the standard Joomla! account activation emails, replacing them with the JoomForms User / Admin Emails instead.
To include activation links for both the user and website administrator, just add either the {user_activation} or {admin_activation} placeholders in the User and Admin emails and they will get replaced with the proper activation links.
plugin also overrides the confirmation email sent to the user after the account has been activated. Its text and subject are controlled by the plugin's main language file. There are 2 ways in which you can edit them:
- Edit the following file: \administrator\language\en-GB\en-GB.plg_system_jfregistration.ini
- add your preferred text and subject for the following language constants:
JF_REG_EMAIL_ACTIVATED_BY_ADMIN_ACTIVATION_BODY
JF_REG_EMAIL_ACTIVATED_BY_ADMIN_ACTIVATION_SUBJECT
The same needs to be done when translating this into other languages, the only difference being that you will need to edit the file that gets loaded by the language you are using (for example, for French you need to edit \administrator\language\fr-FR\fr-FR.plg_system_jfregistration.ini instead).
Perform a language override for the same language constants mentioned above.
Important: Make sure to include the %s syntax as seen in the original translation in order to include the proper information in the emails.
Plugin Configuration
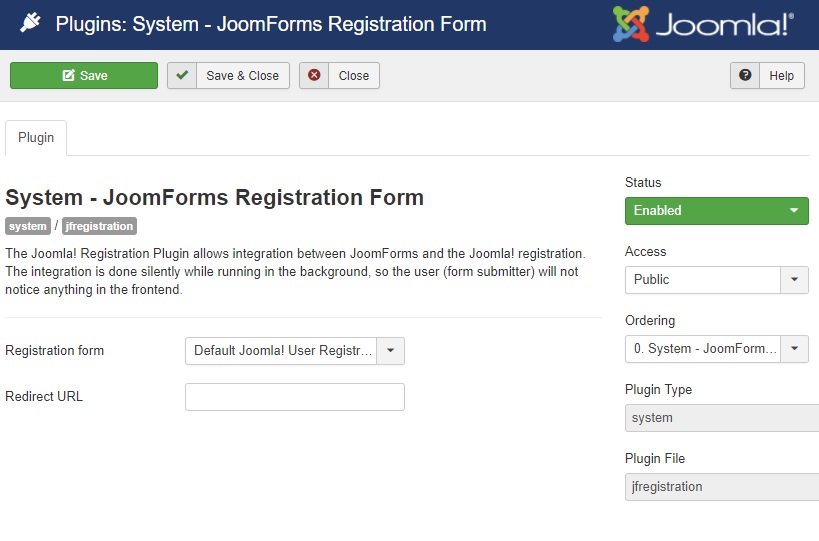
Changing the default registration form can be done with ease by going to go to Backend -> Click on Extensions in top menu then Plugins manager -> search for this plugin "System - JoomForms Registration Form" and edit it.
- You can choose which form you want to be displayed in the registration page
- Set the Redirect URL which will allow you to manually enter the URL you want to be redirected to when you click the Register link.